The LinuxCon 2016 Experience

Hi !

Within this post I will relate my experience of attending LinuxCon 2016 Conference.

As a former Outreachy Linux Kernel intern is part of the program and, of course, open source mindset to present my work in front of the community. Which better opportunity to do so than the great annual Linux conference LinuxCon ? This year LinuxCon Europe took place in Berlin on 4-6th of October.

Ought to be mentioned that this is not the first technical conference I attend but it’s the first time I attend LinuxCon and even so, as a speaker.

First day:

The Outreachy program report was in the first day. I got the chance to meet all other participants as well as our program coordinator Julia Lawall in the morning. During our presentation we briefly presented the technical details of each project but the auditorium was especially interested the experience of our interaction with the Linux Kernel community. To be honest, I have only good things to say about my interaction with them since they have always been helpful offering constructive feedback.

Next, I continuously had to take tough decisions by choosing which presentation to attend since there were always more than just one which sounded attractive.

 I have always come across the notion  of cgroups as a solution for resource management of processes but I didn’t really have time to check out how it works. So, the first presentation I attended was an obvious choice.

An Introduction to Linux Control Groups (cgroups) – Michael Kerrisk [slides]

This presentation offered a very wide view over cgroups, starting with the basic definition and continuing with showing  the available features and the configuration commands which enable the above mentioned features. What I liked about it is that here and there high level concepts and corner cases were presented. cgroups is a bit of an abstract, intangible concept so attending this presentation clarified it for me.

The next presentation offered me a quick overview of the technologies used behind the organization of Linux Kernel project:

From git tag to dnf update: How Linux Kernel Gets Released – Konstantin Ryabitsev, The Linux Foundation

During my internship, I have brought contributions to the code itself but never really thought about the technologies behind the project itself. This presentation serves as great general knowledge since I intent to continue working on Linux Kernel. A complete diagram summarizing the presentation content: link

The first day ended with a speaker party in which I got to meet one of the Linux Kernel legends: no other than Greg Kroah-Hartman. Not to brag but… there is a picture 😀 :

me-and-greg

It was so fun when Linus Torvalds photobombed us:

me-and-greg-and-linus-croped

Neah, I’m joking. I didn’t see him 😦 . It would have been fun tough.

Next days:

Linux-Kernel Memory Ordering: Help Arrives At Last! – Paul E. McKenney, IBM [slides]

Discusses the importance of memory models in kernel development along with some technical examples out from latest researches.
entry_*.S: A Carefree Stroll through Kernel Entry Code – Borislav Petkov, SUSE [slides]
This one was highly technical but very cool. Basicly, it explained how the memory content changes when switching from user space to kernel space.
What’s Up in the Land of the Linux Kernel – Thorsten Leemhuis, Heise Medien GmbH 
Unlike the previous one, this presentation offered a very general overview of the current developments of the Linux Kernel

Linux Kernel Security Update – James Morris, Oracle [slides] In the same generic tone, and iteration of the security developments of LK, such as updates on the LSM API, SELinux, Smack and AppArmor.

lguest: A Journey of Learning the Linux Kernel Internals – Daniel Baluta, Intel How to miss my mentor’s presentation ? Lguest is a small hypervisor running over Linux on X86 and it’s easy and comprehensible, ideal if you want to learn about virtualization and Linux Kernel Internals.

What Kind of Crazy Person Uses a Full Linux Distro for IOT? – Jim Perrin, CentOS showing how to create hardware support for a OS distribution.

Adding CPU Frequency Scaling for Your ARM Platform to Linux Kernel – Bartlomiej Zolnierkiewicz, Samsung Electronics Polska Sp. z o.o. [slides] Another extremely techincal presentation about the implementation of CPU scaling in ARM processors.

Using Static Checkers to Find C Language Security Vulnerabilities in the Linux Kernel – Vaishali Thakkar, Linux Foundation [slides] showed some tools useful to perform static annalists over kernel code.

Last but not least, I attended Julia’s CocciBoF, introduction to Coccinelle. I have worked with Coccinelle before, when applying to Outreachy, but now I got to see more complex examples with that specific syntax.

Summarizing, the Outreachy program represents for me a great start of career. During the working period I gained  precious technical knowledge and attending LinuxCon conference gave me an overview about what happens in this field right now. Most of the presentations were highly technical thus, very captivating to follow and I got in contact with companies that I had no idea that contribute to open source.

Lovely speaking to you, as usual 🙂 Until next time !

GSOC 2016 Summary

As Google Summer of Code is almost over I will create a summary of my contribution to The Linux Foundation during this period.

Firstly, I will describe again my project in order for the further work description to be more comprehensible.

This project aims to add support for Linux Kernel backports in already existing configuration option, localmodconfig. The goal is to automatically determine the available functionalities not only from the drivers provided by the current kernel version but also from all the backported ones. This project is not limited to backports but aims to build a better kernel configuration generator. Current solutions are based on heuristics so this project’s ultimate goal is to provide a deterministic algorithm of generating the most suitable kernel configuration for a target machine.

I have documented my entire work in blog posts so, for additional information about the project’s purpose you can consult this post.

This project consists of research so it had multiple phases / approaches:

1. The first approach was to use hardware interrogation tools to determine what actual devices are available on a particular system and create a configuration which includes the drivers for these devices. During my research I have created this document gathering all information encountered. This approach is not fiable: firstly, the list is not exhaustive for the existing hardware interfaces and, secondly, some tools do not provide driver information about the connected devices so they are not relevant. Finally, I have found a generic hardware interrogation tool ‘udevadm’ which determines all connected devices and driver information for those which have an available driver in the current kernel.

Other documents created during phase 1: Short summary based on the ‘Attack Surface Metrics and Automated Compile-Time OS Kernel Tailoring’ paper which targets same goal as this project.

2. I modified the already existing scripts/kconfig/streamline_config.pl which creates a configuration starting from the output of ‘lsmod’ (comand which returns the current loaded drivers) to apply same algorithm for drivers found with ‘udevadm’

Phases 1 & 2 are documented in this post including conclusions and results.

3. Since not all devices expose the driver name my next task was to extend entries from virtual file system /sys to display by default the CONFIG_* symbol that needs to be set at configuration time in order to add the corresponding driver to the kernel. I extended the kernel ‘struct kobject’ to contain and display this information.

Here you can find the patch for this implementation.

Documentation, conclusions and results: this blog post – section Approach 1.

4. Modifying the kobject structure did not provide the required results so next step was to extend the kernel ‘struct module’ to display the desired information.

Documentation, conclusions and results: this blog post – section Approach 2

The series of patches:

Cover letter

[RFC PATCH 1/3] Add kconfig_symbol attribute to struct module

[RFC PATCH 2/3] Add generation of Module.ksymb file in streamline_config.pl

[RFC PATCH 3/3] Add dynamic pegging of Kconfig symbol

5.  Starting from the previous series of patches I have implemented dynamic pegging of CONFIG_* symbol, namely, CONFIG_* symbol is determined at compilation time by the Makefile and passed to the kernel modules as compilation parameter. This implementation also solves few matching problems between module names – CONFIG_* symbol and optimizes it.

Documentation, conclusions and results: this blog post – section Approach 3

The series of patches:

Cover letter

[RFC PATCH 1/5] Add generation of Module.symb in streamline_config

[RFC PATCH 2/5] Add CONFIG symbol to module as compilation parameter

[RFC PATCH 3/5] Trigger Module.ksymb generation in Makefile

[RFC PATCH 4/5] Set KCONFIG_KSYMB as value for kconfig_ksymb module attribute

[RFC PATCH 5/5] Add kconf_symb as kernel module attribute


What is done by now ?

The result of the project currently is that for each module instance from /sys  there is a kconfig_symbol atribute which displays the CONFIG_* option for that module.

The project’s flow:

  1. Generate associations (module name – CONFIG_* symbol) into file scripts/Module.ksymb
  2. Update Makefile to load file scripts/Module.ksymb and access the matchings.
  3. Update the Makfile to dynamically add the corresponding CONFIG_FOO symbol to the compilation command of kernel module ‘foo’ as macro passed as parameter
  4. Add extra attribute to kernel ‘struct module’ for kconfig_symbol
  5. Update modpost to add that macro as content of kconfig_symbol attribute

The project provides the infrastructure of  loading the associations from a file scripts/Module.ksymb, adding them to the kernel module and update the kernel module’s code to have an extra attribute in order to display this information. Therefore, if the generator will be upgraded / replaced with another one which outputs data in the same format, the other components of the project are perfectly reusable.

The solution offers a good matching (module-name <-> CONFIG_* symbol) correctness percentage but still has some issues. For the tested system (x86_64, configuration generated with ‘make localmodconfig’), from a total of 58 loaded modules, 54 has a correct kconfig_symbol attribute while the other 4 had an empty kconfig_symbol attribute.

example-gsoc

Note: This post contains brief descriptions of each phase. More details can be found in each corresponding blog post.

What will be done ?

  1. Implement a better algorithm for generating the associations (module-name <–> CONFIG_* symbol).
  2. Extend kernel structures to display the CONFIG_* symbol for all devices not only the ones for which drivers are loaded
  3. Extend udevadm to extract CONFIG_* symbols from /sys along with other collected information


Regards,

Cristina-Gabriela Moraru

Writing Makefile code or How to do magic

Today I want to share with you my progress in Linux Kernel Backports project.

I recall that the task is to enable ‘make localmodconfig’ functionality for backported drivers.

The solution idea is the following:

  1. All devices and drivers have instances in virtual file system /sys. First step and the most challenging is to make this instances expose their Kconfig symbol (the CONFIG_FOO symbol that you need to select in the configuration phase in order to include that particular driver in the resulting kernel)
  2. Update systemd’s code to extract the Kconfig symbol from /sys  along with the other information.

With this implemented and having a mapping between the (kernel versions available modules (including backported ones) CONFIG_* symbols)  we could create a valid kernel configuration based on the udevadm output.

I have been working on the first step and I am proud to tell you that it is very close to its target. I will further present you the three approaches for this step:

Approach 1:

Idea: Every entry /sys is, from the kernel’s point of view, an instance of struct kobject kernel type. So, naturally, first approach was to somehow include this information into the kobject in order to be displyed in /sys.

So I did. Let’s have a look at the definition of struct kobject:

 63 struct kobject {
 64         const char              *name;
 65         struct list_head        entry;
 66         struct kobject          *parent;
 67         struct kset             *kset;
 68         struct kobj_type        *ktype;
 69         struct kernfs_node      *sd; /* sysfs directory entry */
 70         struct kref             kref;
 71 #ifdef CONFIG_DEBUG_KOBJECT_RELEASE
 72         struct delayed_work     release;
 73 #endif
 74         unsigned int state_initialized:1;
 75         unsigned int state_in_sysfs:1;
 76         unsigned int state_add_uevent_sent:1;
 77         unsigned int state_remove_uevent_sent:1;
 78         unsigned int uevent_suppress:1;
 79 };


I added another field kconfig_symbol to this structure dedicated to store the CONFIG_FOO symbol associated with the driver who owns the current kobject.

To clarify, let me give you a more pragmatic approach:

What exactly is a kobject ?   –  A directory in /sys

What exactly is a kobject attribute ? – A file in the directory

This is a very loose explanation. /sys is a virtual file system and, consequently, they are virtual directories and files, but from a user’s point of view the explanation is correct.

So, what I did is I added an extra attribute to this kobject named kobject_symbol.

As I said, this kobject_symbol appears as a file in /sys so I created an associate “show” function for it which returns the data from the kconfig_symbol field of kobject. This “show” function is called each time userspace trigger a read operation on this virtual file:

$ cat kconfig_symbol           —-     show() is called

CONFIG_FOO                          —-    content is displayed

Also, I updated the sysfs code in order to add this extra attribute along with the others when creating the /sys virtual file system at boot time.

All good so far. Since the population of the kconfig_symbol field was cumbersome, for test purposes,  I changed the show() function to return the constant string “CONFIG_GSOC”.

The result is that the kconfig_symbol attribute appears for each kobject but when trying to read the contents of this attribute nothing is displayed because the show() function is not called as it should.

Since this approach required modifying the code of the sysfs and potentially mess up the entire OS if the code varies for different OSes, we decided to take a more sandboxed approach.

Approach 2:

Since we are interested in  the CONFIG_* symbols for drivers, another idea is to add kconfig_symbol as a kernel struct module attribute. This structure is created for each driver required as module and not built-in so it’s conceptually closer to what we need.

This time there is a patch set because the implementation is more complex since I added also the generation and population of kconfig_symbol.

Step by step:

  1. Add kconfig_symbol as module field
  2. Add kconfig_symbol as module attribute using MODULE_ATTR macro which sets the default show() function [which displays the data from the field of struct module with the same name)
  3. Updated scripts/kconfig/streamline_config.pl to generate file scripts/Module.ksymb containing the associations (module-name – CONFIG_* symbol).
  4. Update modpost code to add populate this field in the auxiliary file generated at compilation [module-name.mod.c] with information provided by the file scripts/Module.ksymb


The full series of patches and the cover letter can be found here:

Cover letter: https://lkml.org/lkml/2016/7/31/84

Patches:

[RFC PATCH 1/3] Add kconfig_symbol attribute to struct module

[RFC PATCH 2/3] Add generation of Module.ksymb file in streamline_config.pl

[RFC PATCH 3/3] Add dynamic pegging of Kconfig symbol

The result of this patch set: attributes kconfig_symbol are added for most of the modules but not for all of them. This happens because modpost adds the attribute only if it finds suitable content for it in Module.ksymb [the associate CONFIG option]. But not for all modules a CONFIG symbol is encountered. Some of the module names do not match the makefile definition (the superobject in which are linked all other objects) and the internal definition (how is set in structure driver.name). A few examples:

Driver filename		Module name
-----------------------------------
lineage-pem[.o]		lineage_pem
phy-ab8500-usb[.o]	abx5x0-usb
ehci-mxc[.o]		mxc-ehci

Even though there are small differences between names, the current algorithm searches for exact matches so some modules are left out because of this.

Another problem would be that for some symbols have more associate CONFIG_* symbols in Module.ksymb. This happens due to more reasons:

  • duplicate checking it’s not done, so we end up having the same CONFIG_* symbol appear multiple times for one module name
  • for same module we have different CONFIG_* symbols for different architectures
  • in some cases we have multiple different CONFIG_* symbols for same object name because that object is linked within more modules; thus, all their CONFIGs appear in the list

Also, the mapping is inefficient since modpost searches for the CONFIG_* symbol for each module name.

Now introducing…… *DRUMS* ……

Approach 3

The idea here is that Makefiles from Linux Kernel tree contain all the information: module names and CONFIG_* symbols. So I tried to do the associations in-place in the Makefile hierarchy without external tools.

Before explaining what I did exactly I think I should clarify a bit how Makefiles work. You can understand a lot by reading files in Documentation/kconfig/ but let me highlight a few key points:

As you all know any LK compilation requires a .config configuration file which says which modules are compiled and how are they compiled (built-in or separated modules). So, supposing we have a .config file, when running make or make modules that file is included using the Makefile language directive include, thus is run like a regular Makefile. So what does the format

CONFIG_FOO_A=y

CONFIG_FOO_B=y

CONFIG_FOO_C=m

 mean if interpreted as a Makefile ?

Simple. It’s a series of variable assignments. After including the .config file all CONFIG_* symbols become Makefile variables with y/m as values. Further, when descending into subdirectories, Makefiles have the following format:

obj-$(CONFIG_FOO) = objfoo1.o objfoo2.o objfoo3.o

So, variable CONFIG_FOO is immediately resolved to y/m/n according to its previous setting and the variable obj-y or obj-m is set to a list of objects for the namespace of that directory.

Given this logic, associations CONFIG_* <-> module name are lost because of the make resolves the variables before I can intervene to save them. So, what I did:

  1. I kept the idea of using streamline_config.pl to generate Module.ksymb but this time I constrained it to generated only the objects which have exactly one CONFIG_* match. For selecting one module you need to set only one CONFIG_* symbol. So, logically, the objects which have exactly one CONFIG_* symbol are final modules and not objects useful at link time. This way I optimized also the size of Module.ksymb file and also I solved the “little-difference-in-names” problem.
  2. I kept the idea of adding an extra attribute to struct module named kconfig_symbol, displaying the CONFIG_* symbol associated with that module.
  3. I added dynamic pegging of CONFIG_* symbol: the Makefile adds at the compilation command the CONFIG_* symbol (deduced from the content of Module.ksymb) as a define KBUILD_KSYMB using the parameter -D
  4. I updated modpost to populate the kbuild_symbol attribute with the value of the KBUILD_KSYMB macro

This solution is extremely close to the target functionality. Tested on a standard system with Ubuntu it adds the kconfig_symbol attribute for all modules and populates it correctly for 54 out of 58 kernel modules. This is a very good rate. The few attributes that are not correctly populated belong to module names that, from various reasons, have more associated CONFIG_* options and are filtered by Module.ksymb generation.

However, approach number 3 is very close to what we need because it implements the infrastructure for loading of  associations (module name – CONFIG symbol) from Module.ksymb file and dynamic pegging of CONFIG symbol to the module during compilation. What is to be done now is to implement a better Module.ksymb generator. streamline_config.pl was a good choice at first but it was built for a different purpose and does not perfectly fit with the needs of this project.

This are the patches:

Cover letter: https://lkml.org/lkml/2016/8/17/471

Patches:

[RFC PATCH 1/5] Add generation of Module.symb in streamline_config

[RFC PATCH 2/5] Add CONFIG symbol to module as compilation parameter

[RFC PATCH 3/5] Trigger Module.ksymb generation in Makefile

[RFC PATCH 4/5] Set KCONFIG_KSYMB as value for kconfig_ksymb module attribute

[RFC PATCH 5/5] Add kconf_symb as kernel module attribute

Feel free to try them out 🙂


The Depths of Hardware Discovery

Hi there ! 🙂

I want to share with you my  progress with Linux Kernel Backports project.

As I was saying in the previous article, the task is to extend ‘make localmodconfig’ option from Linux Kernel for backported drivers.

Currently, ‘make localmodconfig’ creates a configuration file based on the output of lsmod command, namely creates a configuration that contains all modules inserted in the kernel of the machine which runs lsmod. For example, you can run lsmod on a target machine, save its output and then create new kernel for the target machine.

target$ lsmod > /tmp/mylsmod
target$ scp /tmp/mylsmod host:/tmp

host$ make LSMOD=/tmp/mylsmod localmodconfig

You may want a different kernel version (drivers are updated, bugs resolved etc.) or want more or less functionalities than the original kernel but keeping the required modules.

There are two shortcomings of this method:

  1. lsmod retrieves the modules that are present in the kernel, not necessary the ones that are actually used.
  2. We may run lsmod on a machine with a particular hardware functionality and an older kernel version X that does not support that functionality. Consequently, there will be no module retrieved by lsmod that covers that hardware need. If, in the meantime, the Linux Kernel was added a driver for that functionality and then it was backported to the kernel version X we could not benefit from its support using  ‘make localmodconfig’ although it’s available for us.

I intend to solve this problems with this project.

Clearly relying on the output of lsmod is problematic so let’s see where the driver information can come from:

The first idea is to use hardware interrogation tools such as lspci, lsusb etc to detect the actual devices connected to different interfaces and the drivers that support them. I have made a research on this tools and I have created a spreadsheet summarizing all encountered tools and the exact commands to return driver information. This is a good approach but some encountered tools do not provide driver information at all and, moreover, there is no guarantee that there exists a tool for each interface.

A most suitable approach is using a generic tools such as systemd. Does it sound familiar ?

Well, if you use a wide-spread Linux distribution, you clearly use systemd. Surely the next screen is familiar to you:

Debian_Unstable_Systemd_Boot

Systemd is the init system used to bootstrap the operating system’s user space and all its processes. Moreover, systemd is a system and service manager, a software platform and provides various interfaces that expose functionalities provided by the kernel. Thus, systemd is not just the the init daemon but also refers to the entire software bundle around it, which includes the daemons journald, logind and networkd, and many other low-level components. The following images shows an example of systemd architecture used by the operating system Tizen (source: Wikipedia):

Systemd_components.svg

systemd is widely-used among Linux distributions because of its speedup brought by intense parallelization. An excellent read to understanding the principles of systemd is this blog article.

Relevant for my project is the systemd utilitary udev which inspects connected devices:

udevadm info -e

The previous command lists all connected devices along with the other information about them. Within this other information the driver name is included. It would seem like exactly what I need. Further, I extended streamline_config.pl (the main script that implements ‘make localmodconfig’) to call and use the output of the previous command instead of the output of lsmod. Although the script generated a configuration similar with the one from lsmod, OS booting fails with the following output:

boot_error

There are many guesses for this error: there may be some non-hardware devices not managed by udevadm but required at boot time, or maybe their driver name was not shown in the output of udevadm or even the SAT resolving algorithm from streamline_config.pl fails for this particular case. I will make a closer investigation and keep you updated.

Until next time ! 😉

Show must go on !

Hi 🙂

I have recently started working on a new project on Linux Kernel Backports, namely to provide the backporting facility for configuring the kernel with localmodconfig option. Throughout this project I will be guided by Luis Rodriguez and Steven Rostedt.

If the project sounds a bit ambiguous, let me provide you some background:

First of all, what is backporting ?

In Linux Kernel most bugs are encountered in time by users and that is why older kernel versions are more stable and recommended for usage in industry.  However, sometimes functionalities from newer kernels are needed. Backporting is a method of providing newer features to older kernels. Given that API’s change in time, the idea behind backports is to define a generic function for a particular functionality that behaves differently for different kernel versions. For example,

imageedit_3_5966714445

Fig 1. Backports patch example (source)

The image provides a useful example of backports patch: the declaration and usage of the structure net_device_ops is available in kernel versions greater or equal to 2.06-26 but the USB device operations should be defined for older kernels so the patch also adds the implementation for the older API. The same functionality is provided by running different code according to version.

If you find the subject interesting you can check out this paper and this conference speech for a more detailed insight.

Next, what is localmodconfig ?

localmodconfig is an option for make tool used to create a configuration (ie. a .config) file based on the loaded modules of the target system. For example, if you want to build a configuration for the current machine you should call:

make localmodconfig

in the root of the kernel tree. This will access the lsmod tool to get loaded modules, will check dependencies and finally find all CONFIG_* options that need to be set for the current machine. The trick works even if the target machine is not the one we work on:

target$ lsmod > /tmp/mylsmod
target$ scp /tmp/mylsmod host:/tmp

host$ make LSMOD=/tmp/mylsmod localmodconfig

The LSMOD enviromental variable holds the path to a file with the output of lsmod on the target machine. The .config generated suits the target machine.

The implementation uses the script for the tree scripts/kconfig/streamline_config.pl. This script parses recursively Kconfig and Makefile files starting with the ones from the root of the tree and builds a few internal data structures to define the dependencies between symbols. It then uses the lsmod file (or generates a lsmod file using the lsmod tool from the current machine) to find which modules are needed and, based on the internal structures, determines the CONFIG_* options that need to be set in order to have all the modules available.

A few useful data structures are:

@kconfigs -> array of Kconfig file names

@makefiles -> array of Makefile names

$config -> specific configuration (CONFIG_*)

%depends -> hashtable with key=configuration and value=string of dependencies for that configuration

%objects -> hashtable with key=makefile target and value=array of required targets for the key-target to be compiled

There are many useful variables, I just listed the most important ones. All of them are mapped on the kconfig and Makefile structure explained in Documentation. I recommend Documentation/kbuild/kconfig-language.txt and Documentation/kbuild/makefiles.txt as excellent readings in the subject. Some Perl knowledge would be useful too.

Now what’s the project exactly ?

The project is to provide backports functionality for localmodconfig, namely creating a configuration with localmodconfig should return not only the drivers available in the current distribution, but also the backported ones. The project shifts a bit from what I have done so far: if until now I have written kernel code for driver development, now I will work on the kernel build system itself. Level up ! 😉

The great part about this project is that is requires some research beforehand. There is no definite solution for the problem, only approach ideas. The goal is to optimize as much as possible the kernel configuration, thus the final kernel image.

Wish me good luck 🙂 !

Maxim success for Maxim potentiometer

Hello Hello !  🙂

I am thrilled to inform you that my last driver for Maxim MAX5487 digital potentiometer has just been accepted into Linux Kernel and will be available in the next release. I’m happier than Oscar winning Leo right now 😀 Many many many thanks to my mentor Daniel Baluta for guidance.

leoglobes3-xlarge

Let me present some technical details of the implementation:

This is MAX5487, a digital potentiometer which did not have driver support in Linux:

max5487

First of all, I will explain how a digital potentiometer works in comparison with the old fashion one.

In the mechanical potentiometer is a 3-terminal resistor with a rotating contact used to adjust the position of the middle terminal in order to create a variable resistor or a voltage divider. Potentiometer

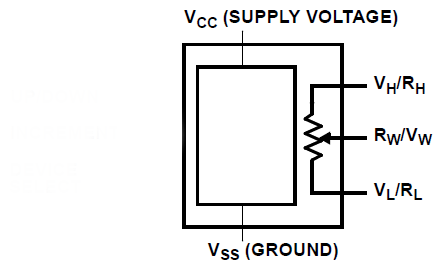
In comparison, the digital potentiometer has no rotative slide and sets the middle terminal according to a value held in one of the internal registers. The following image emphasises exactly what I am talking about. VH and VL are the circuit points for high and low potential, respectively, while VW is the sliding point. If VW is set to VL the resistence is equal to the maxim resistence of the potentiometer and if VW is set to VH the resistence is almost 0. VW’s position is determined by the value of the corresponding register.

digpot

As you can notice in a previous image, MAX5487 has 2 similar circuits A (HA, WA, LA) and B (HB, WB, LB) which represent two different input channels from the driver’s point of view.

Perhaps you wonder how to set the VW values onto the potentiometer’s registers.

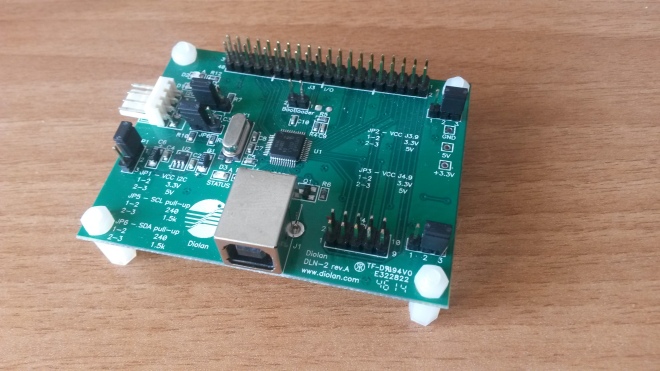
MAX5487 receives input via SPI, a popular protocol for embedded devices. Since the PC does not have and SPI interface,  I made use of a device called Diolan which is able to intermediate the USB interface of the PC with the SPI interface of the potentiometer.

20160316_090146.jpg

Wires connect the SPI interface of the potentiometer to the SPI interface of the Diolan. The Diolan makes the translation and communicates with the PC via the USB cable. The extra wire from the upper pin of MAX5487 represents the Chip-Select pin and is controlled by a GPIO pin of the Diolan.

This assembly enables the potentiometer to be detected as being directly connected to the PC. The driver permits the user to set in software the VW values which will be sent to the potentiometer and written into the dedicated registers. For device communication I used the kernel functions offered by SPI and GPIO APIs. Further, the code speaks for itself. The complete implementation can be found here.

Thanks ! 🙂

Hero work: Saved HMC5843 from Staging

Hi !

Recently I have done some work to solve issues of driver HMC5843 in order to move it from staging directory to the main tree.

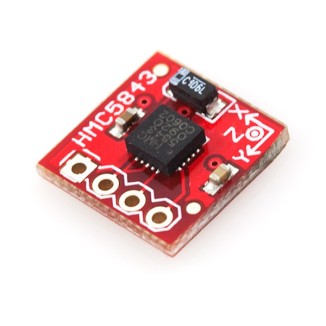
This is HMC5843:

hmc

HMC5843 is a Honeywell triple-axis digital compass, that already had a driver in the staging directory. The staging directory contains drivers that are incomplete or unstable or simply do not comply with the standard. My task was to figure out why HMC5843 driver was still in staging and solve its issues.

The driver provides support for both I2C and SPI protocols but the sensor I used communicates on I2C, so the setup was very similar to the one of the previous driver, TH06.

20160310_115349

20160310_115237

This sensor has a hardware particularity: it generates a bias current, namely a correction DC current that sets the direction of the magnetic field on X, Y, Z axis. The driver declared a non-standard attribute for configuring this bias current but I switched the implementation to the standard kernel ABI and added an extra attribute to present the available configurations for it. Also, the driver supports a family of sensors not only HMC5843 and there was a particular value that was valid for one sensor but invalid for the rest of them and the driver was rejecting it as invalid for all of them. Moreover, I added documentation for the newly added attributes. Another issue was that implementations of functions suspend and resume were switched and the sensor was put in the complementary state when these functions were called.

All patches got accepted and you can review them. Check the patches that start with iio:hmc5843 from the list.

It’s true that hero work is tough but somebody has to do it. Until next time ! 🙂

knight

Baby [penguin] steps: First accepted patches

Hello again !

Within the last post I told you about my work at TH06 sensor and that the patch was sent for review at the IIO maintainers. Well, the review came and I found out that there already was a driver in Linux Kernel that was pretty similar to mine and that could be adjusted to support TH06 too. I am talking about drivers/iio/humidity/si7020.c, the driver for Si7020 humidity and temperature sensor from Silicon Labs. Although the sensors have different manufacturers, they have the same register set and they implement the same command interface (check out the datasheets: TH06 and SI7020).

So the next challenge was to create the connection between this driver and TH06 sensor. As I said previously, the logical link between the physical device and the driver is done by a name identification so I extended the id table of the driver with the id of TH06 [patch].

Similarly, Hoperf TH02 sensor has an identical communication interface with Silicon Labs SI7005 so I extended already existing drivers/iio/humidity/si7005.c driver with the TH02 id [patch]

You know how they say: That’s one small step for me and one giant leap for mankind ! 😉

tux_space

Achievement unlocked: First IIO driver

I just completed my first IIO driver for Hoperf TH06 humidity and temperature sensor. Within this post I will explain how to connect the sensor to the PC, I will reveal the mysteries of reading a datasheet and I will present the anatomy of an IIO driver. Stay tuned !

The Hardware:

Meet TH06:

TH06 is a humidity an temperature sensor. The first image emphasises the hardware logic performing the measurements and the second image shows the available pins.

TH06 communicates on an I2C interface. I2C is popular multi-master, multi-slave bus protocol used to connect lower speed peripherals to a processor. It uses two bidirectional lines: one for data (SDA – serial data line) and one for clock (SCL – serial clock line). The second image shows the above mentioned pins plus the pins for power supply (VDD) and ground (GND).

The computer does not have an I2C interface to directly receive input from the sensor so an additional device will be used. The Diolan, shown in the next image, makes the conversion from I2C protocol to USB and enhances communication between the sensor and the PC.

20151222_124657

The Diolan is connected to the PC by an USB cable and the sensor is connected to the I2C interface of the Diolan via standard wires with labelled heads:

20151221_160003

The complete assembly looks like this:

20151221_160746

When connecting the Diolan to the PC, the kernel will log the discovery of a new USB device:

$ dmesg | tail -5
[ 3339.902024] usb 3-2: new full-speed USB device number 2 using xhci_hcd
[ 3340.031671] usb 3-2: New USB device found, idVendor=a257, idProduct=2013
[ 3340.031682] usb 3-2: New USB device strings: Mfr=1, Product=2, SerialNumber=0
[ 3340.031687] usb 3-2: Product: Diolan DLN2
[ 3340.031692] usb 3-2: Manufacturer: Diolan

But we will not test the driver directly on the PC, but on the virtual machine. So we have to make sure that the virtual machine’s kernel includes the settings for the Diolan. For this, at make menuconfig search for the keywords Diolan and DLN2 and select all options that show up as results. Recompile.

Also, we have to “announce” the virtual machine of the presence of the sensor as  a new I2C device. For this, we will use the I2C interface provided by the operating system /sys/bus/i2c/ to set the name and the register address of the new device. This configuration is available until the VM is closed so I suggest writing it in the qemu/fsimg/etc/rcS file to be done each time when is started. At the end of the file, add the following line:

echo th06 0x40 > /sys/bus/i2c/devices/i2c-0/new_device

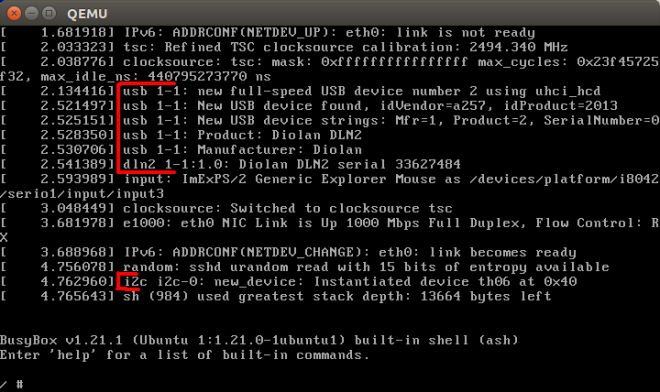
If you have done this settings correctly, at boot time, you should see the following output:

diolan and sensor2


The Driver:

Before writing a driver you must read the datasheet of the device to see how to send / receive data and commands to / from it. For TH06, the datasheet provides the following information:

TH06 provides a 7-bit configuration register placed at address 0x40 and a series of  supported commands for performing measurements, reset, configuration etc. (Page 16). Also, the sensor measurements return some raw values so, to obtain a more human-readable values, the datasheet provides a couple of formulas for data processing (Pages 19, 2o).

The driver for TH06 registers the sensor as an I2C client and uses the I2C API for sending data via I2C bus.

When loading the driver into the kernel, devices on the I2C bus are enumerated in search of the one referred by the driver. The logical link between the physical device and the driver is done by a name identification: for this, we must set an id that must be identical with the sensor name declared in /sys/bus/i2c.

static const struct i2c_device_id th06_id[] = {
    {“th06”, 0},
    {}
};

Firstly, the driver declares the device’s channels: there are two channels – IIO_HUMIDITYRELATIVE and IIO_TEMP – both providing 3 descriptive values: the raw data, the scale and the offset.

The driver implements the device registration in function probe, called when the I2C bus matches the I2C device with the driver and function read_raw to be called when a measurement is triggered from userspace.

Function read_raw checks the requested channel and then analyses which is the requested information from that channel. If the raw information is requested, the driver triggers a relative-humidity/temperature measurement using the appropriate command TH06_READ_RH/TH06_READ_TEMP and the I2C API function i2c_smbus_read_word_swapped to read 16 bits from the sensor.

The scale and the offset are precalculated from the formulas from the datasheet and returned as 2 values (characteristic and mantissa) because the kernel does not provide a floating point unit.

When the driver is inserted into the kernel, an associated entry in /sys/bus/i2c is available:

i2c dev

The files in_temp_* and in_humidityrelative_* are associated with the channels I have declared within the driver. Reading them will call the declared function read_raw.

dev read

The driver is sent to the linux-iio maintainers for review. Wish me good luck ! 🙂

IIO Setup

Let me present you the work environment.

Like I mentioned in a previous post, I will be working in the Industrial I/O Subsystem (IIO) of the Linux Kernel. For this, a short setup is needed.

The first step is to download the kernel source tree of IIO and compile it.

git clone https://www.kernel.org/pub/scm/linux/kernel/git/jic23/iio.git

Before compilation you need to create the kernel configuration. At this step you customize your kernel. Within the Linux Kernel there are a lot of implemented drivers but the final kernel image should include only those needed by the OS. This is the moment when we choose which drivers to include in our image. Let’s start from the default configuration:

cd iio/
make defconfig

Now, let’s particularize the configuration to include the IIO Subsystem.
make tool has also a UI available trough this command:

make menuconfig

If you are getting an error from a missing ncurses library, most probably you are missing the libncurses5-dev package. Install it and try again. If everything goes fine, a similar interactive menu should appear.

meke menuconfig

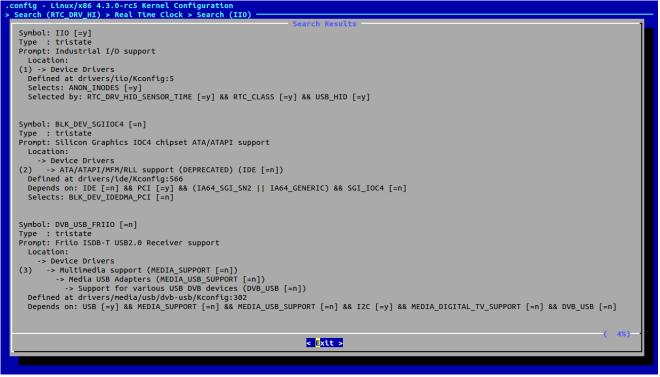
Now search for IIO. To search for a keyword press / key and a prompt asking for the word to be searched will appear. The result should look like this:

settings1

Note that results are numbered and you can select one of them by typing its number. The result that interests us is the first one and is not selected (“[=n]”). Also,  we can see that depends on other 3 modules: RTC_DRV_HID_SENSOR_TIME, RTC_CLASS and USB_HID. The last two are present in the kernel but the first one is not, so, we need to select this one too in order to be able to include IIO in the kernel. After that, IIO will be automatically selected:

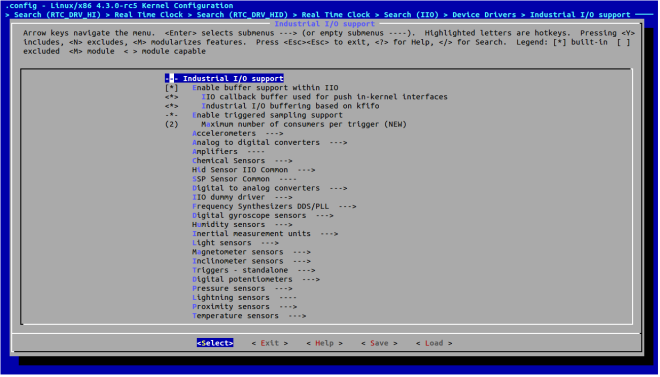
settings2

Thus, there are some more auxiliary IIO modules that we need so go to the first result (press 1) and set them accordingly:

settings4

Click Save and you are done with the configuration.

Now compile the kernel and the modules:

make -j `nproc`
make modules

After this step a file called bzImage (the compressed kernel image) will be available: iio/arch/x86/boot/bzImage .

The second step would be to create a virtual machine which runs with a minimal operating system based on our previously compiled kernel. For this, the mentors provided me this archive with a qemu virtual machine. You will need several packages installed in order to run this virtual machine: build-essential, genisoimage, syslinux, qemu, kvm. Also, you will need to create a reference in the qemu directory to the bzImage file resulted from the kernel compilation:

ln -s path_to_iio/iio/arch/x86/boot/bzImage bzImage

Now start the virtual machine:

sudo make

Congratulations ! You completed the setup ! 🙂